Pages

Monday, December 14, 2015

IBM Integration Bus Editions compared

IBM Integration Bus Edition/Mode comparison


This post will explain the difference between the different IBM Integration Bus edition.

IIB is available in four different modes described at the link http://goo.gl/oIVCLM.
Comparison of the different editions is also provided at the page IBM Integration Features.

These are (from the higher to the lower capacity): Advanced, Standard, Scale and Express.
Note that
  • There is a trade up path from any lower version to a higher one. 
  • The mode can be changed without requiring to reinstall the product, it's just a command line
In this post I will not linge on the scale mode as it was introduced to have a migration path for users running on WebSphere Enterprise Service Bus.
As this later will be end of support in 2018, users have the possibility to convert their WESB licenses to IBM Integration Bus in scale mode. This mode as some restrictions to match what WESB was offering.

The following schema provides an overview of the Advanced, Standard and Express mode:


Express vs Standard

The Express and Standard mode have a common limitation: they can only have one Integration Server per node. This will be explained in further detailed later when comparing Advanced to Standard.
The difference between Standard and Express stands in features that are provided.
The features available for each mode are provided here at the knowledge center features per operation mode.
Express only provides a subset of features that are already very rich. You can implement flows using most of the nodes, performs transformations using graphical mapper, java, .NET.

Please find after the most important features that are not provided and would help you decide if this mode is appropriate for your usage:

  • Resequence nodes: to resequence the messages order using a built-in node
  • ERP nodes: SAP, SIEBEL, ...
  • CICS, IMS nodes
  • File Read node: to retrieve a file content in the middle of a flow
  • DataBase Input node: polling a database using a built-in node
  • Collector node: been able to collect messages from different sources using a correlation
  • Policy Enforcement Point node (PEP): been able to enforce the security in the middle of a flow
  • MQ Managed File Transfer nodes
  • ESQL code

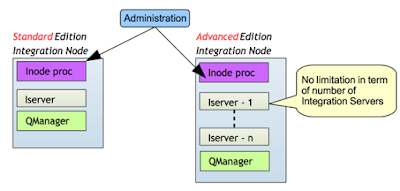
Standard vs Advanced

In Standard all the features are allowed: in term of features, there is no difference between standard and advanced.
The difference stands in the number of Integration Server that can be defined per Integration Node.
Find at the following post the overview of the runtime if you are not familiar with the terms:  a-view-of-ibm-integration-bus-runtime.


This overview will help to understand the main differences and implication of the different editions:

  • Isolation: on advanced mode, you can have multiple integration server per Integration node. This means that you have a greater isolation when running on advanced mode as you can have flows deployed on separate integration server. You gain isolation in term of memory and address spaces.  If one flow makes the process to crash, it will not affect flows deployed on other Integration Server. 
  • Administration: you can administrate only one integration node at a time. You can administrate multiple Integration Servers of one Integration Node through the same web user interface. If you have multiple Integration Node, you would need to have multiple UI. Also if you need to apply a configuration change that requires the process to restart, all the flows deployed in the Integration Node will be impacted.
  • Queue Manager: in advanced mode all Integration Server of the Integration Node can access in binding mode the same queue manager associated with the Integration node (in V10, integration node doesn't required to have a queue manager - in some cases you would need to do so though). If you have multiple Integration Node it may be required to interconnect them.
  • Scalability: as each Integration Server is one process, it may be possible to better distribute the load across available processors when running in advanced mode. 

If you would like to know the limitation in term of license between these two modes, please find this information at the following post ibm-integration-bus-licensing-principle.

Thursday, July 30, 2015

Test SSL configuration with curl

In a previous article I explained how to configure IBM Integration Bus to use HTTPS with an InputHTTP node (httphttps-listener-behavior-with-iib.html).

I realized that it may not be evident to test the configuration.
I will provide here some hints on how to test a configuration where a server (for instance IBM Integration Bus) is configured to receive https connections with mutual authentication.

For these test I am using very useful tools: curl and openSSL.
useful information on curl can be found here.

Configuration

The keystore of the Integration Server node holds the personal certificate of the server. This certificate contains a public and private key.
The trustStore of the Integration Server node holds the certificate of the client that needs to be authenticated. This certificate contains only a public key. This key has been provided by the client.

In order to make a mutual authentication, the public key of the server has to be provided to the client and the client has to provide it's public key.

To extract the IBM Integration Server certificate from the JKS keystore, one can use the IBM Key Man tool. This tool is started from the menu (windows) or using strmqikm.
Select the folder Personal Certificate and click on extract certificate. If you select the type as "Base64-encoded ASCII data" the certificate will be in the PEM format (privacy-enhanced mail).
The tool provides as extension "arm". This format is equivalent to pem. The extension can be changed from PEM to ARM.

If you used the key man tool to create a self-signed certificate for the client, you would need to export the certificate in pkcs12 format (p12). This certificate would contains the public and private key.

Certificate format 

PEM  (privacy-enhanced mail) format
It's a "Base64-encoded ASCII data" certificate and this format is equivalent to arm. The extension can be changed from PEM to ARM.
PKSC12 certificate may have pfx or p12 as extension.
DER is a binary encoded certificate.
Get more information on SSLShopper

Testing

Curl requires PEM certificate.

In our example here, the client needs to have a personal certificate to be able to sign. The personal certificate for the client is in PKCS12 format, therefore you would need to convert it in PEM format.
This conversion can be done using openSSL (openssl commands) using the command:

openssl pkcs12 -in ClientPersonalCert.p12 -out ClientPersonalCert.pem -nodes

You can then use Curl to call the service.

curl --carcert serverCertificate.pem --cert clientPersonalCert.pem:<password> --cert-type PEM https://myserver:port/test


  • serverCertificate.pem is the certificate from the server that has been extracted from the keystore. It holds only a public key
  • clientPersonalCert.pem is the personal certificate of the client. This certificate has been exported from a keystore and has been converted into a PEM format.

If you need to perform an HTTP GET with query parameters, you may use the following curl command:

curl --carcert serverCertificate.pem --cert clientPersonalCert.pem:<password> --cert-type PEM -G -d "<myqueryParms>" https://myserver:port/test


    • G is to tells that you are issuing a GET
    • d is to provides the query parameters

Thursday, July 23, 2015

HTTP/HTTPS listener behavior with IIB HTTPInput nodes

HTTP/HTTPS listener behavior with IIB HTTPInput nodes

When a flow containing HTTPInput nodes are deployed on an Integration Server, the default behavior is to use the broker wide HTTP Listener.
This is different is you are deploying a flow using SOAP nodes. In this later case, the http listener used is the embedded HTTP listener of the Integration Server.

For your information, the broker wide listener is using MQ behind the scene. So it can be enabled on the version 10 if a default queue manager has not been configured.

In this blog I will explain how to configure the Integration Node to use the embedded listener of an Integration Server when using HTTP nodes. 
I will also explain how to configure the Integration Node to use SSL (HTTPS).

In the following text, I will assume that
* The integration node is called: IBMIBus
* The integration server is called: IServer1

Configuration for Embedded HTTP Listener

First check the configuration of the Integration Server using the following command:
mqsireportproperties IBMIBus -e IServer1 -o ExecutionGroup -a


This command will show the property "httpNodesUseEmbeddedListener". If this property is set to true, this means that when you will deploy a flow having a HTTPInput node, the embedded HTTP listener will be used.
To change this value use the following command:
mqsichangeproperties IBMIBus-e IServer1 -o ExecutionGroup -n httpNodesUseEmbeddedListener -v true
The port used by the embedded HTTP listener is defined dynamically when the first flow having HTTP nodes is deployed or when the Integration Server is started if it had such flow already deployed. If no flow having HTTP nodes has been deployed, the listener will not be activated.

To check the port used by the embedded HTTP listener, use the following command:
mqsireportproperties IBMIBus -e IServer1 -o HTTPConnector -a
The port can be specified if required (this will disable the automatic port number attribution). This is done using the following command:
mqsichangeproperties IBMIBus -e IServer1 -o HTTPConnector -n explicitlySetPortNumber -v 8085


Embedded listener configuration for SSL (HTTPS)

In this part, I will provide the commands to configure the embedded HTTP listener to use SSL.

Prerequisites
* The Integration Server has been configured to use embedded HTTP listener
* A key store has been created. It contains a certificate for the integration server (that can be used for the public and private key)
* A key store or trust store containing the client certificate if mutual authentication is required.
* The password used to access the keystore is "password".

The keystore and truststore configuration can be found at the following link:

Configuration

The Integration Server uses two objects to configure the SSL: the ComIbmJVMManager and the HTTPSConnector
The ComIBMJVMManager object is used for the entire Integration Server. It is used by input HTTP nodes as well as request HTTP nodes.
The HTTPSConnector is used only for the input HTTP nodes. 
If you need different keystore for the http request nodes and for the http input nodes then you may configure the ComIBMJVMManager for the HTTP request nodes and the HTTPSConnector for the input http node.
If there is no differences, you can configure only the ComIBMJVMManager object.

ComIBMJVMManager configuration


The following command is used to configure the object:
mqsichangeproperties IBMIBus -e IServer1 -o ComIbmJVMManager -n keystoreFile -v "c:\ks_IBMIBus.jks"
mqsichangeproperties IBMIBus -e IServer1 -o ComIbmJVMManager -n truststoreFile -v "c:\ks_IBMIBus.jks"
mqsichangeproperties IBMIBus -e IServer1 -o ComIbmJVMManager -n keystorePass -v <password>
mqsichangeproperties IBMIBus -e IServer1 -o ComIbmJVMManager -n truststorePass -v <password>
mqsichangeproperties IBMIBus -e IServer1 -o ComIbmJVMManager -n keystoreType -v JKS
mqsichangeproperties IBMIBus -e IServer1 -o ComIbmJVMManager -n truststoreType -v JKS
<password> the password to provide. You may provide the password directly in the command line or store the password in the secure integration node registry using the command mqsisetdbparms.
To use the secure registry, you have to provide the password in the command line with the form <MyIntegrationServer>Keystore::password. The command would then be:
mqsichangeproperties IBMIBus -e IServer1 -o ComIbmJVMManager -n keystorePass -v IServer1Keystore::password

Then store the password using the command line
mqissetdbparms IBMIBus -n IServer1Keystore::password -u ignore -p password
The user has no usage here, you may set whatever value you would like.

You need to restart the integration node if you change any of these properties.

If you need to configure the HTTPSConnector, follow the same approach.

Important Note: if you are using a browser tools like HttpRequestor from firefox, you would first need to accept the server certificate. This may be done by simply performing a GET of the service URL in firefox self. You would then be prompted to accept the certificate.

Specific server certificate to be used

You can specify the certificate to be used by the HTTPInput node for SSL. By default the first personal certificate found in the keystore is used. This certificate is used to authenticate the server to the client.
If you require to set a specific one set the property "keyAlias" of the object HTTPSConnector to the right alias.
mqsichangeproperties IBMIBus -e IServer1 -o HTTPSConnector -n keyAlias -v myAlias

Mutual authentication

To enable mutual authentication,  the property "clientAuth" of the object HTTPSConnector has to be set to true.
mqsichangeproperties IBMIBus -e IServer1 -o HTTPSConnector -n clientAuth -v true
By setting this value you would have using a browser:
Error code: ssl_error_handshake_failure_alert

Create a certificate and add the certificate containing the public/private key to the browser and the public certificate to the Integration Server Truststore (or keystore depending of your configuration). 

On firefox, this is done by going to option -> Advanced -> Certificates -> View Certificates -> Your Certificate -> import
You should have a pfx or p12 file ready.
You may create a self signed certificate for test, using the IBM key Management tool. 
Create a self signed certificate then export and select the "PKCS12" key file type.


Thursday, March 12, 2015

setup/script in IIB for Record-Replay


You will find in this post the commands that is necessary to configure the Integration Bus to record and replay the events generated by the flows.

Even though all the following information is available in the knowledge center, I found sometime difficult to find out all the necessary commands to be executed.

Parameters

Integration server

Integration Node name: <INName>
Integration Server name: <ISName>
IIB Queue Manager name: <IIBQMgrName>

Configurable Service

    Data capture store name. Configuration to define the database to be used: <DCStoreN>
DataCaptureSource name. Configuration to define the event source: <DCSourceN>
Data Destination Name: configuration used to define the queue where the message will be send when using the replay mechanism: <DDName>
Queue name used to send back the data: <ReplayQName>

Database configuration

ODBC Database DSN: <DSN>
Table Schema used to store the IIB events: <IIBSchema>
User/password for accessing the database under the schema <IIBSchema>: <DBUsr>/<BDPwd>

Script

Create configurable services for IIB

1. DataCaptureSource

mqsicreateconfigurableservice <INName> -c DataCaptureSource -o <DCSourceN> -n dataCaptureStore,topic -v <DCStoreN>,"$SYS/Broker/<INName>/Monitoring/#"
2. DataCaptureStore
mqsicreateconfigurableservice <INName> -c DataCaptureStore -o <DCStoreN> -n backoutQueue,commitCount,commitIntervalSecs,dataSourceName,egForRecord,egForView,queueName,schema,threadPoolSize,useCoordinatedTransaction  -v "SYSTEM.BROKER.DC.BACKOUT","10","5",<DSN>","<ISName>","<ISName>","SYSTEM.BROKER.DC.RECORD","<IIBSchema>","10","false"
3. DataDestination
mqsichangeproperties<INName> -c DataDestination -o <DDName> -n egForReplay,endpoint,endpointType  -v "<ISName>","wmq:/msg/queue/<ReplayQName>@<IIBQMgrName>","WMQDestination"

Database connection configuration

1. Create odbc connection in ODBC Data Source Administrator (Demo =  <DSN>)
2. Set security connection information
mqsisetdbparms <INName> -n <DSN> -u <DBUsr> -p <BDPwd>
3. Run script DataCaptureSchema.sql from db2 command line (non-administrator). This script are available under
<IIBInstallation>\ddl\db2

Tuesday, March 3, 2015

IBM Integration Explorer installation

I recently had some trouble with my IIB plugin (administration) after applying a MQ Explorer Fix:
I downloaded the MQX fix, and after the installation, the IIB nodes are not available anymore in my explorer.

It seems that the IIB is not installed.
I remembered that the plugin is configured by adding the links in the eclipse installation folder.
This seems to be ok as well.

I decided to uninstall the IBX and reinstall it but even that doesn't solve my issue.

After chatting with some Gurus, I finally discovered that eclipse does not notice that the plugin is no more linked or updated.

So what is the option?

The trick is to uninstall the IBX and reinstall it but under another directory.
From that moment, I usually set a version number on the folder name:
C:\IBM\IIBExplorerFP2

This is it.

Don't forget to start the IBX after using the -c option.

If you still have any trouble, let me know.

Monday, January 26, 2015

ESQL code to create mail with attachments using broker events

In this post I will provide an example on how to process events generated by a flow using the default IBM Integration Bus monitoring event capability.

The example will show how

  • to serialize a tree into BLOB using ESQL
  • how to send a mail with attachment
  • How to create/prepare the LocalEnvironment and Root for the EmailOutput node
  • The usage of the business event capabilities provided by IIB


The principle is simple:

  1. Configure a flow to generate an IIB event
  2. Create a subscription to this event with a WMQ Queue as endpoint
  3. Create a flow that consumes these events and send an email with attachments

The example in this post shows how to create mail with attachments using ESQL but this could be easily made using Java as well.

Configure a flow to generate an IIB event


The event generated as a well defined structure and the schema can be imported into a library using new model -> IBM predefined model.

Any nodes in a flow can be configured to generate events (Generating events in WebSphere Message Broker) that may contain context information and payload.

It is for example possible to configure a node to include the localEnvironment, ExceptionList and Message tree structure (under Root). These information will be placed into the IIB events under the folder "complexContent".
Note that the LocalEnvironment is reset when an exception occurs, so the data that would have been stored in this tree would be wiped when the message is propagated to the catch terminal of the input node (will be covered in a future post).

Finally it is also possible to include the full payload (as it was received) by selecting in the monitoring node properties "include payload as bitstream". The payload will then be included into the IIB events under "BistreamData".

Create a subscription

The IIB runtime is publishing the IIB events on the WMQ topic "$SYS/Broker/IBMIBus/Monitoring/#".
Using the WMQ Explorer you create a subscription to these events and select a destination queue:

 The flow that sends email

The flow is very simple: MQInput -> ComputeNode -> EmailOutput node
The compute node is used to create and configure the message that will be send using the emailoutput node. 
The node it self is configured the minimum properties: server:port, email to, from and security.
The rest will be provided by the code in ESQL (subject, body content and attachments).

In this example the complexContent included in the incoming business event is serialized into bitstream and will be send by mail as attachment.
The payload if present is also send as attachment.
The body of the mail is made of event origin data and using a DFDL to have a text document separated with CRLF.

The code is provided here after:


Friday, January 23, 2015

ESQL code Sample

In this post I will provide some example of ESQL code that could be useful.

The codes are made available using Gist.

TREE --> XML 

In the following gist, I provide an example on how to create a XML physical representation of a IIB in memory tree.
The principle is the following
  1. Create an element of type XMLNSC parser
  2. Copy or create a IIB tree
  3. Use the function ASBITSTREAM to serialize the tree in bitstream using the parser (here XML)


BLOB --> XML

In the following gist, I provide an example on how to create a XML tree from a BLOB.
In the example the BLOB is provided as test in a hexadecimal representation. The code parses it to an XML and append it in the current XML.


Friday, January 16, 2015

XPATH in IIB

In this post, I will provide some example of xpath expression allowing to perform complex transformation within a GDM (Graphical Data Mapper).

I will append this post with new example that I would found that could be of any usage.

For this first post, I will use a sample message having the following structure

<?xml version="1.0" encoding="UTF-8"?>
<Q1:INVOICE xmlns:Q1="http://www.acme.be/acme"
xmlns:xsi="http://www.w3.org/2001/XMLSchema-instance"
xsi:schemaLocation="http://www.acme.be/acmeInvoice.xsd ">
<CUSTOMERID>ID001</CUSTOMERID>
<NAME>X</NAME>
<INVOICE_ITEM>
<STOCK>OUT</STOCK>
<EXI>IMPORT</EXI>
<CONTAINER>abc</CONTAINER>
<ISOCODE>2210</ISOCODE>
<QUANTITY>1</QUANTITY>
</INVOICE_ITEM>
<INVOICE_ITEM>
<STOCK>OUT</STOCK>
<EXI>EMPTY</EXI>
<CONTAINER>abcd</CONTAINER>
<ISOCODE>2210</ISOCODE>
<QUANTITY>2</QUANTITY>
</INVOICE_ITEM>
<INVOICE_ITEM>
<STOCK>OUT</STOCK>
<EXI>EMPTY</EXI>
<CONTAINER>abcde</CONTAINER>
<ISOCODE>4532</ISOCODE>
<QUANTITY>4</QUANTITY>
</INVOICE_ITEM>
<INVOICE_ITEM>
<STOCK>OUT</STOCK>
<EXI>EMPTY</EXI>
<CONTAINER>abcdef</CONTAINER>
<ISOCODE>4532</ISOCODE>
<QUANTITY>2</QUANTITY>
</INVOICE_ITEM>
<INVOICE_ITEM>
<STOCK>IN</STOCK>
<EXI>IMPORT</EXI>
<CONTAINER>CONTAINER</CONTAINER>
<ISOCODE>ISOCODE</ISOCODE>
<QUANTITY>2</QUANTITY>
</INVOICE_ITEM>
</Q1:INVOICE>


Sum, Count

It is possible to compute the sum of elements under a repeating node in one expression.
For example if you would like to make the sum of the "Quantity" field of all the INVOICE_ITEM nodes, you could do this by performing the following map:

XPath expression is "fn:sum($INVOICE_ITEM/QUANTITY)"

Count can be used in the same way. Count will provide the number of elements.

Predicates

Predicates allows to select only a subset of nodes based on a criteria.
In the above example, it may be possible to compute the sum of QUANTITY for INVOICE_ITEM having its STOCK child element equal to "OUT".
This could be done by using predicates.
The above xpath expression would be changed with:

fn:sum($INVOICE_ITEM[STOCK='OUT']/QUANTITY)

The predicates here is "[STOCK='OUT']".

It is possible to use an input element within the predicates. For example, imagine that you have a list of Stock. And you would like to make the quantity sum only for the STOCK that are in the list.
This could be achieved by providing as input the stocklist to the xpath transform:
With the XPath expression
fn:sum($INVOICE_ITEM[STOCK=$STOCK1]/QUANTITY)

It is possible to have more than one "where" clause. For example is we would like the sum of  Quantity for STOCK='OUT' and EXI='IMPORT' then the following Xpath could be used:

fn:sum($INVOICE_ITEM[STOCK='OUT' and EXI='IMPORT']/QUANTITY)

be careful that the "and" is case sensitive.

Distinct Values

Last useful xpath expression for this post. Distinct values.
Distinct values could be used to retrieve only elements having distinct values.
For example let's say that the input message where STOCK can have the value "IN', "OUT'.
In the example above there are 4 Invoice Item with Stock equals to "OUT" and only 1 with "IN".
The XPATH expression used here is "fn:distinct-values($INVOICE_ITEM/STOCK)"
The input is the INVOICE_ITEM repeating node and the output is a repeating element STOCK under STOCKLIST.
The Stocklist will be populated by STOCK element having the value "IN" and "OUT":

<STOCKLIST>
        <STOCK>IN</STOCK>
        <STOCK>OUT</STOCK>
</STOCKLIST>

If you need to sort on multiple elements then the option that you may have is first create a concatenation of these fields in a previous map and then use the distinct values xpath expression.
So for example if you need to have the list of invoice items having distinct values for STOCK and EXI, then you may create a first map that concatenates STOCK and EXI using the xpath expression "fn:concat" and place this list in the localenvironment and then in the next map use the disctinct values xpath expression
.


HA Cache deployment with IBM Integration Bus

I have been involved in project where customer is looking to have a possibility to cache data  in a high available way within the integration layer.

In this post I will provide some points that have to be take into account when designing the IIB deployment architecture in order to have a high available cache.

Introduction

IBM Integration Bus provides an out of the box caching mechanism based on WebSphere eXtreme Scale.
WebSphere eXtreme Scale provides a scalable, in-memory data grid. The data grid dynamically caches, partitions, replicates, and manages data across multiple servers.

This cache can be used to store reference data that are regularly accessed or to hold a routing table.

The cache is not enabled by default and it is really easy to enable it: the default configuration is activated by setting a configuration parameters through the IBM Explorer administration tool.
To activate the cache across different Integration Node instances, a XML configuration file (templates are provided) has to be defined.
More information on the cache can be found here What's new in the Global Cache in IBM Integration Bus v9

Specialized skills in extremes scale is not necessary in order to use the cache. There is however two important cache components that may be good to know

  • Catalog servers: component that is embedded in an integration server and that controls placement of data and monitors the health of containers. You must have at least one catalog server in your global cache.
  • Container servers: component that is embedded in the integration server that holds a subset of the cache data. Between them, all container servers in the global cache host all of the cache data at least once. If more than one container exists, the default cache policy ensures that all data is replicated at least once. In this way, the global cache can cope with the loss of container servers without losing data.
More information about terminologies can be found here
Global cache terminologies

Principle

The catalog and container servers are embedded in Integration Servers.

To have a high available cache the following is required:

  • At least two catalog servers have to be online: without catalog server it is not possible to reach the data in memory
  • At least two container servers have to be online: this is necessary to replicate data on two different location

One more important point to know: it is not possible to configure an integration node to host a catalog server when it is configured as a multi-instance Integration node.

Possible deployment architecture

If the target is an active/active deployment, the following architecture is possible:
In this architecture, the catalog server is deployed in one Integration Server on both side. The other Integration servers are used to host containers. 
To improve the performance, the catalog server would be placed on a dedicated Integration Server (separated from the containers). This is not required though, a catalog server may reside on the same server as a container.
If the license doesn't permit to have multiple Integration Server per Integration Nodes (standard edition), then you could create a separate Integration Node on the same server to host the catalog server. 

If the target deployment consists of multi-instance queue managers, because for example the message residing on MQ has to be quickly recovered, the following architecture is possible:

Due to the fact that a multi-instance Integration Node can't host a catalog server (a configuration restriction), it is necessary to define an extra Integration Node to hold the catalog server (Integration Node - Catalog). This Integration Node doesn't need to be high available.
The multi-instance Integration Nodes are configured to host the container servers. Two active integration nodes are required to provide an high available cache (replication made on two different servers).

Additional information

The first time that the cache is configured using multiple catalog servers, the cache will become operational when at least two catalog servers are started. If the catalog servers are defined in two Integration Nodes, these two nodes would need to be started before been able to use the cache. Once the cache has been activated (this can be checked by looking at the logs or administration events) it is possible to lose (or stop) catalog servers (at least one catalog server should stay online) without impact to the cache access. This can be useful if maintenance on one instance has to be performed.

The default configuration is to have a maximum of 4 container servers per Integration Nodes. But more containers can be configured by configuring the Integration Server manually using the IBM Integration Explorer.

There are no limitation in term of container servers that can participate to the global cache. If you require more memory, you can just add a new container in the system. There is no need to restart the whole system !! Or you could also access an external extreme scale component like XC10 (Deciding between the embedded global cache and an external WebSphere eXtreme Scale grid).

Integration Server roles can be changed using the IBM Integration Explorer. It is possible to define a policy configuration file and assign it to the Integration Node using the IBM Integration Explorer. Once this has been done, you can start the Integration Node to take the configuration into account. If the global cache policy of the Integration Node is changed using the IBM Integration Explorer to "NONE" when the Integration Node is running, the current configuration will be held even if the Integration Node is restarted. It is therefore possible to change the Integration Server roles afterwards. More information on how to set the roles are provided here How to fix integration server roles in a Global Cache configuration in IBM Integration Bus and WebSphere Message Broker V8.

References

Information about global cache